Automate Row Deletion in Google Sheets with Apps Script
In this post, we'll cover how to remove rows automatically in Google Sheets using Apps Script, ensuring you save time and streamline your spreadsheet management. You're probably already familiar with the manual way of right-clicking and deleting rows, but there's a more efficient way to handle this—automation!
Manual versus Semi-Automatic Deletion
You may know that you can manually delete rows in Google Sheets by right-clicking and selecting "Delete row." You can even select multiple rows or cells and delete them at once, with Google Sheets indicating which rows are being deleted. However, if you frequently need to delete specific rows, a semi-automatic method might interest you.
A quick trick is to right-click, delete a row, and then use the Command + Y keyboard shortcut to repeat the action. This method redoes the last action performed. For instance, if you want to delete multiple rows one by one, you can continue using Command + Y to repeat the deletion. This method is semi-automatic but not as efficient as full automation.
Moving to Full Automation
For fully automated row deletion, we use Google Sheets' Apps Script. Let's get started with an example—deleting the second row of your sheet.
Step-by-Step Guide:
1. Access Apps Script:
- Open your Google Sheet and navigate to Extensions > Apps Script.
2. Identify Sheet and Row:
- First, identify the sheet you're working on. For this example, we'll use "Sheet 1."
3. Write the Script:
- Use the following Apps Script to delete the second row:
     function deleteSecondRow() {
     SpreadsheetApp
         .getActiveSpreadsheet()
         .getSheetByName('Sheet1')
         .deleteRow(2);
     }
See the row removal code here too!
4. Save and Test the Script:
- Save your script with Command + S and make sure it runs smoothly.
Creating a Custom Menu for Automation
To make this process more user-friendly, you can create a custom menu in Google Sheets:
1. Create the Menu:
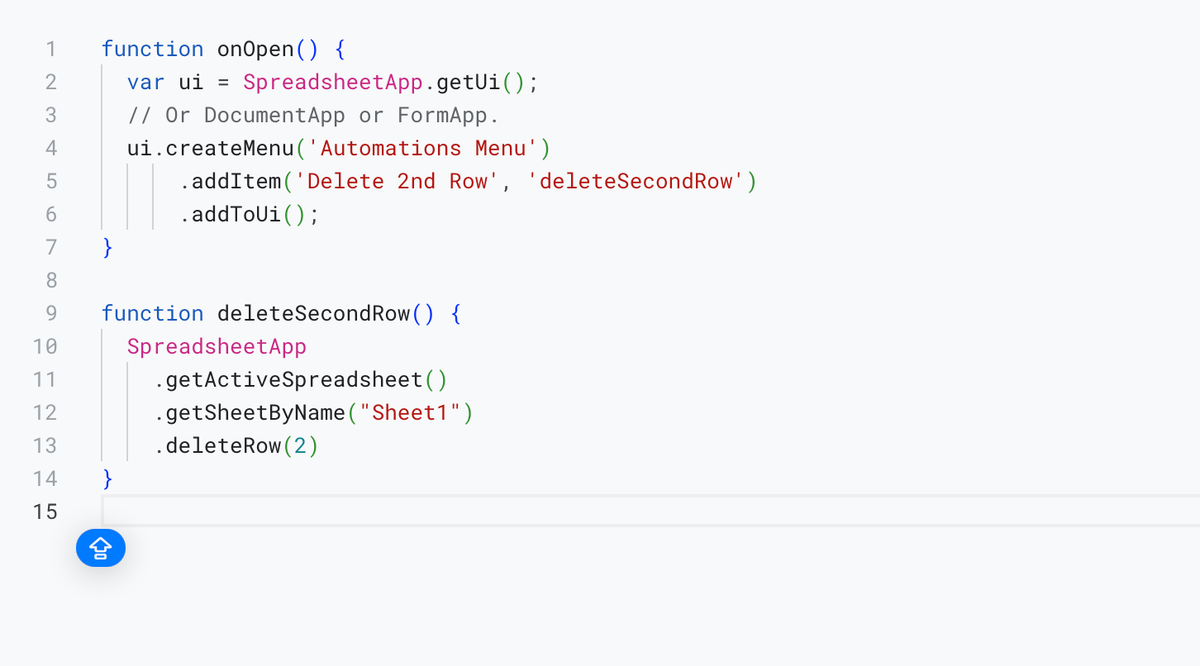
- Navigate to the Apps Script editor and add the following code to create a custom menu called "Automations":
     function onOpen() {
       var ui = SpreadsheetApp.getUi();
       ui.createMenu('Automations Menu')
         .addItem('Delete Second Row', 'deleteSecondRow')
         .addToUi();
     }
2. Refresh and Authorize:
- Refresh your Google Sheet to see the "Automations" menu. The first time you run it, you may need to authorize the script to access your Google Sheets.
### Automating with Triggers
Now, let’s set up a trigger to delete the second row automatically each day.
1. Set Up the Trigger:
- Go to Extensions > Apps Script and click on the Triggers icon on the left.
- Add a new trigger and set it to run the `deleteSecondRow` function.
- Configure the trigger to be time-driven, choosing a daily interval, for instance, from 7 PM to 8 PM.
Managing Triggers
1. Edit or Delete Triggers:
- If you ever need to edit or delete a trigger, navigate back to the Apps Script editor, click on Triggers, and you can manage your existing triggers.
2. Limitations:
- Note that only the creator of a trigger can edit or delete it. If another user creates a trigger, you won't be able to modify it.
Now you can Automate row deletions
Automating row deletions in Google Sheets using Apps Script can save you a lot of time and effort. Whether you're looking to perform a one-time automation or set up recurring deletions, the steps outlined above will help you achieve your goal seamlessly. Instead of manually right-clicking and deleting rows, you can now automate this process, ensuring efficiency and accuracy in your spreadsheet management.
We hope this guide helps you leverage the power of automation in Google Sheets to streamline your tasks and boost productivity!
---
Enjoy automating your Google Sheets row deletions and explore further automations to simplify your workflows!
Watch on YouTube