
How to reference a different Google Spreadsheet in Apps Script?
Transferring Data Between Cells in Different Spreadsheets

The IMPORTRANGE function might be your go-to option if you need to reference data between Google spreadsheets. For greater flexibility and automation, you can also use Google Apps Script. This guide will help you use Google Apps Script to transfer data or reference from one spreadsheet to another.
Transferring Data Between Cells in Different Spreadsheets
To start, we will explore referencing data from a cell of a source spreadsheet to a cell of a destination spreadsheet using Apps Script.
Prepare Two Spreadsheets
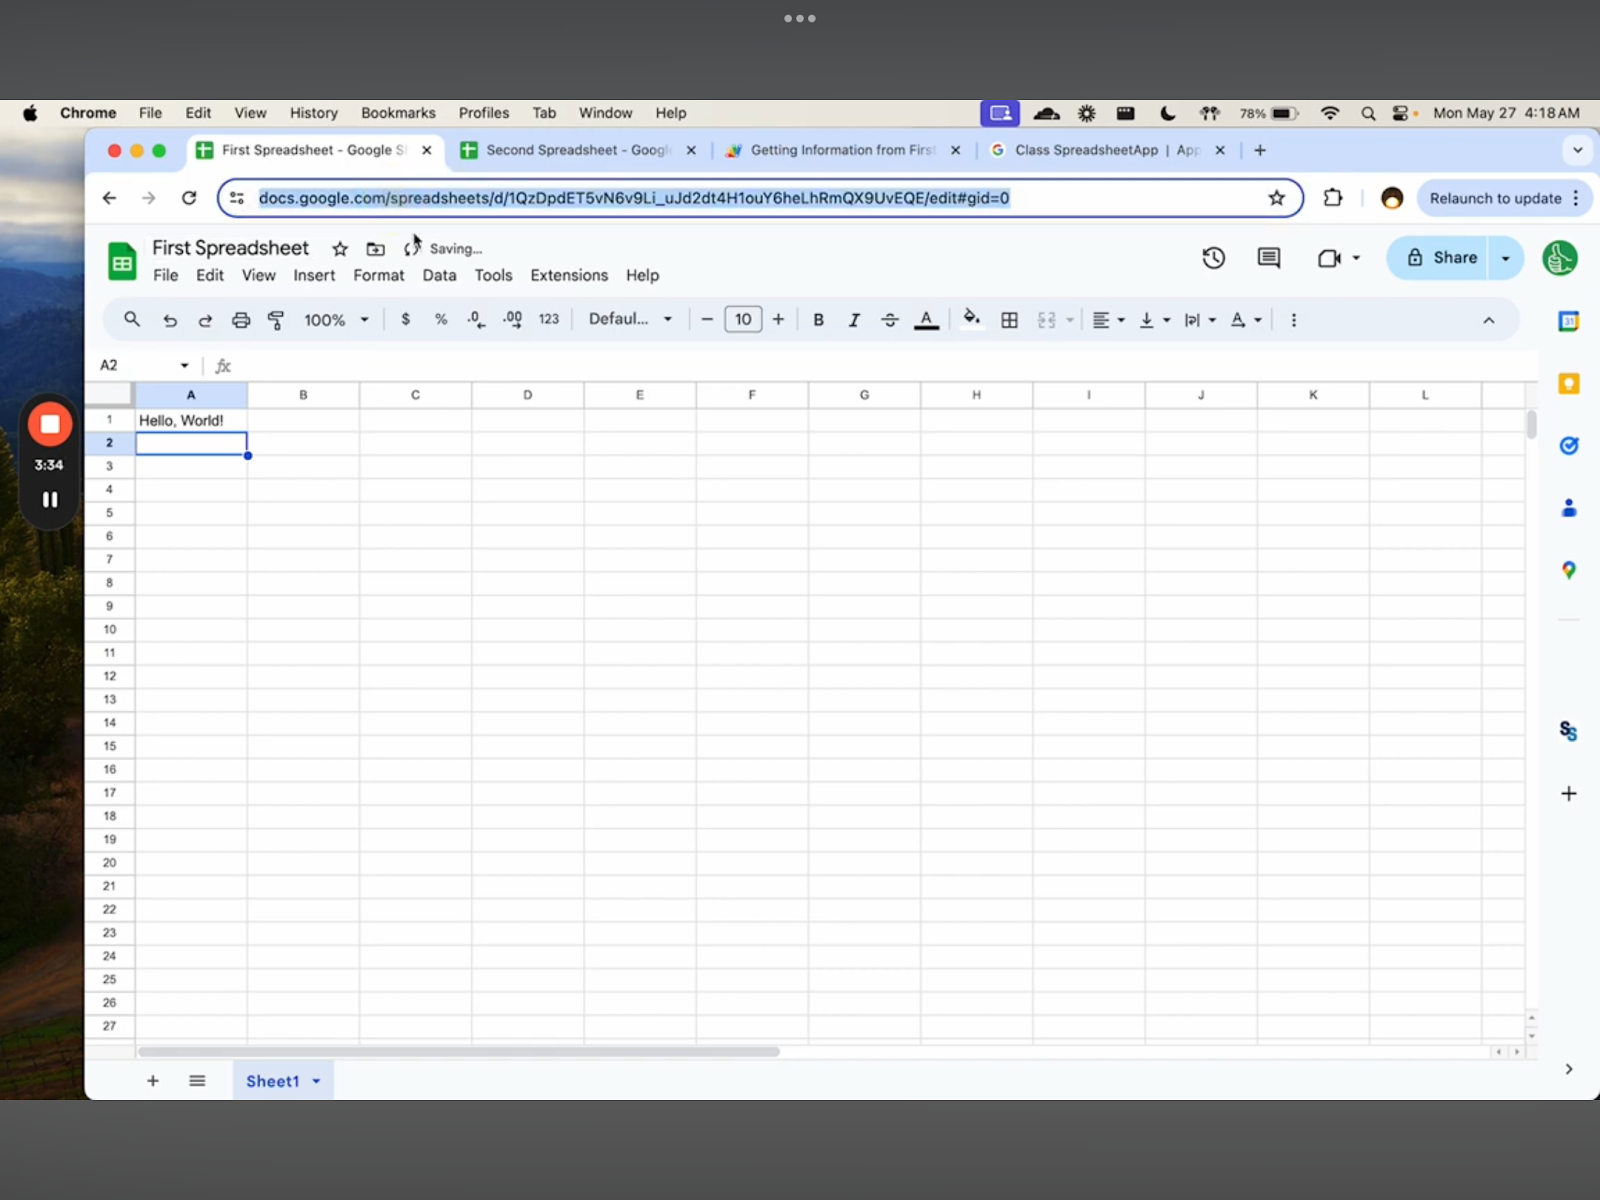
Make sure you have two spreadsheets ready: the source spreadsheet and the destination spreadsheet and name them accordingly. Here we will use the name First Spreadsheet for our source spreadsheet and Second Spreadsheet for our destination spreadsheet.
Our goal is to transfer the data from the First Spreadsheet to the Second Spreadsheet. For instance, if the First Spreadsheet has the phrase "Hello World" in cell A1 of the source spreadsheet, then “Hello World” must also appear in cell A1 of the destination spreadsheet.
Write the Apps Script Code
We must first go to the Second Spreadsheet to import the data here. In the Second Spreadsheet, open the Apps Script by clicking on the Extensions in the menu, then selecting Apps Scripts.
In the Apps Script Editor, you can copy and paste the default code below, and then modify it later.
DEFAULT CODE
function FunctionName () {
var text = SpreadsheetApp.openByUrl(“URL_OF_FIRST_SPREADSHEET”)
.getSheetByName(“SheetName1”)
.getRange(“CellName1”)
.getValue()
SpreadsheetApp.getActiveSpreadsheet()
.getSheetByName(“SheetName2”)
.getRange (“CellName2)
.setValue(text)
}
MODIFYING THE CODE
First, change the function name in this code: function FunctionName () {
Replace FunctionName with any desired name, avoid using spaces or special characters. You can use underscores (_) or camel case (e.g., myFunction).
Now, update the code below with your actual spreadsheet details from the First Spreadsheet:
var text = SpreadsheetApp.openByUrl(“URL_OF_FIRST_SPREADSHEET”)
.getSheetByName(“SheetName1”)
.getRange(“CellName1”)
.getValue()
For the “URL_OF_FIRST_SPREADSHEET”, you must paste the URL of your First Spreadsheet between the quotes.
Similarly, replace “SheetName1” with the actual name of the sheet in your First Spreadsheet, such as "Sheet1". For “CellName1”, enter the specific cell name where your data is located, like "A1".
Finally, adjust the code below to place the data in the Second Spreadsheet:
	SpreadsheetApp.getActiveSpreadsheet()
.getSheetByName(“SheetName2”)
.getRange (“CellName2)
.setValue(text)
Make sure that “SheetName2” is replaced with the sheet name in your Second Spreadsheet where data should appear, like "Sheet1". Similarly, replace “CellName2” with the cell where you want the data to go, such as "A1".
EXAMPLE OF THE MODIFIED CODE
Here's how the code looks with actual values:
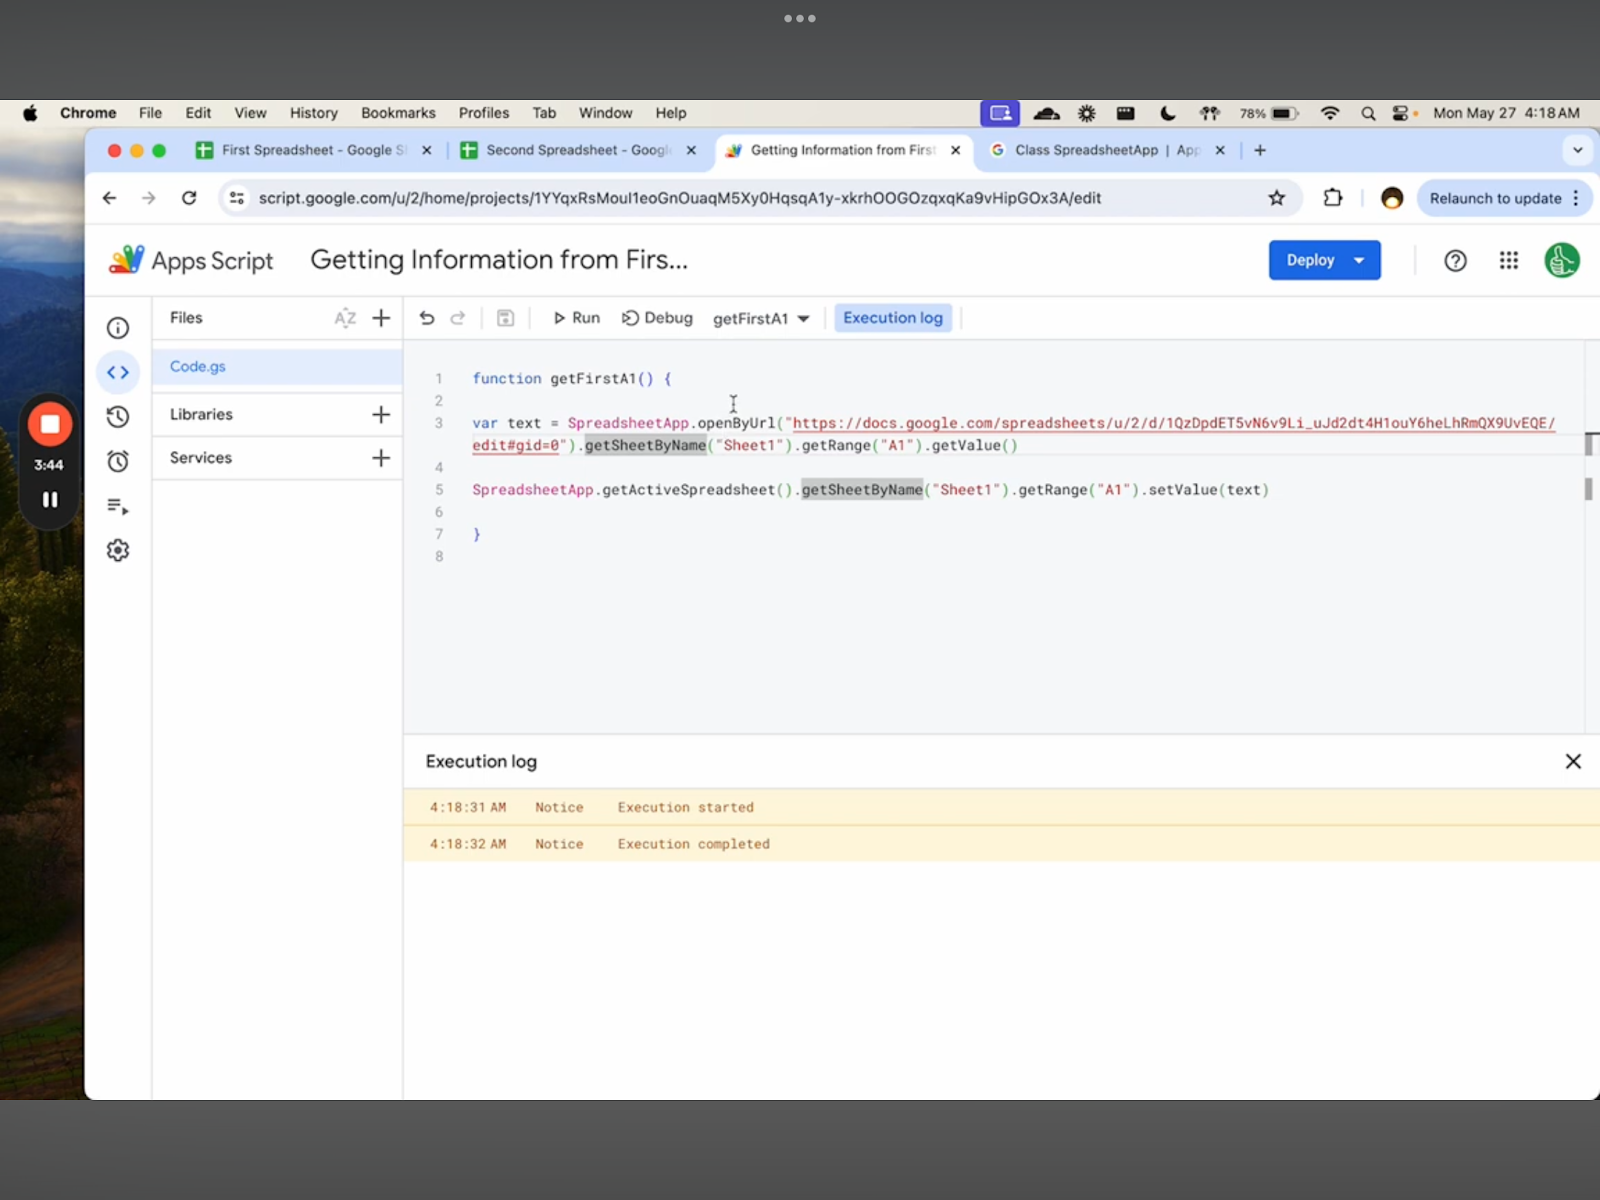
function myFunction () {
var text = SpreadsheetApp.openByUrl”https://docs..google.com/spreadsheets/d/1QzDdpdET5vN6v9Li_uJd2dt4H1ouY6heLhRmQX9UvEQE?edit#gid=0”)
.getSheetByName(“Sheet1”)
.getRange(“A1”)
.getValue()
SpreadsheetApp.getActiveSpreadsheet().getSheetByName(“Sheet1”)
.getRange (“A2”)
.setValue(text)
}
RUN THE SCRIPT
Now that you've modified the code, Save the script by pressing Ctrl+S or clicking the save icon, then Run the script by clicking the Run button (triangle icon).

Check if the Data Transferred
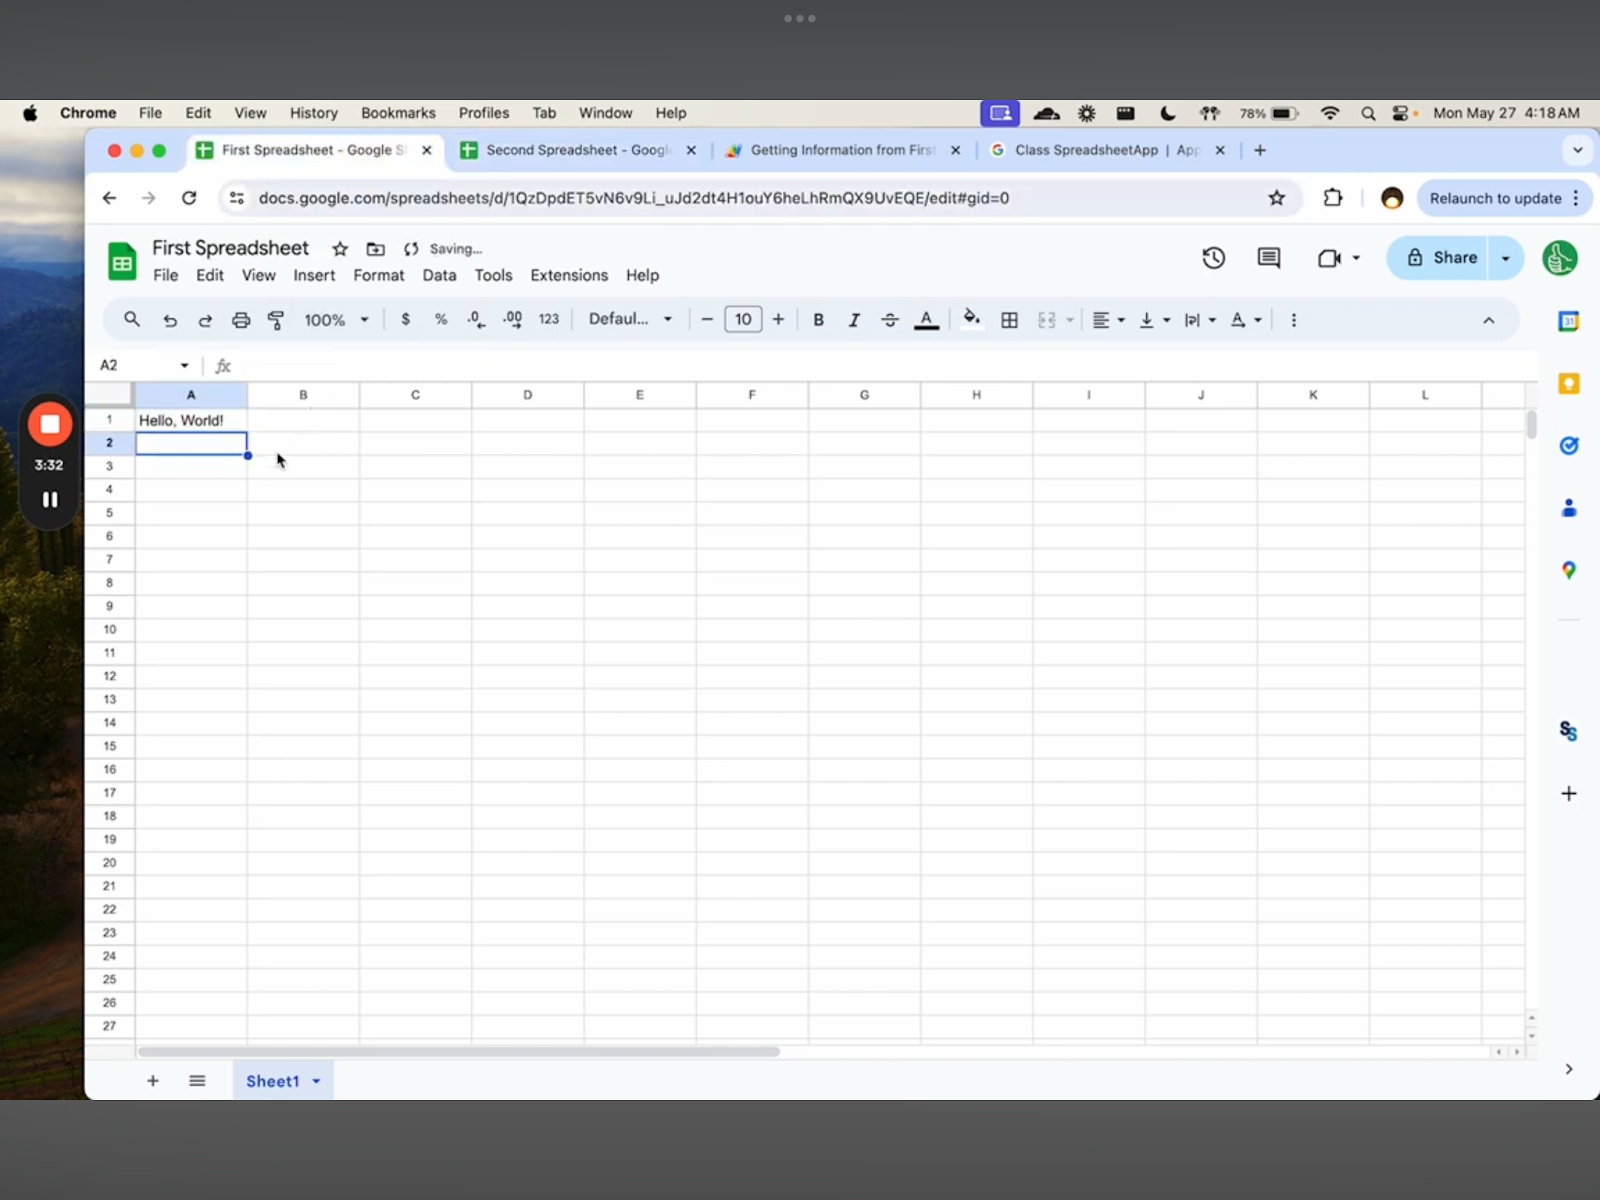
After running the script, verify if the data from cell A1 in the First Spreadsheet appears correctly in cell A1 of the Second Spreadsheet. If the data is displayed correctly, it indicates that the script is functioning as intended.
Transferring Range of Data in Different Spreadsheets
Now that you have learned to transfer one data cell to another, let's explore how to transfer a range of data cells from one spreadsheet to another. For instance, you may want to transfer data from an entire column or a selection of rows from one spreadsheet to another.
Prepare Two Spreadsheets
Make sure you have two spreadsheets ready: the source spreadsheet and the destination spreadsheet. We'll call them "First Spreadsheet" (source) and "Second Spreadsheet" (destination).
Write the Apps Script Code
We must first go to the Second Spreadsheet to import the data here. In the Second Spreadsheet, open the Apps Script by clicking on the Extensions in the menu, then selecting Apps Scripts.
In the Apps Script Editor, you can copy and paste the default code below, and then modify it later.
DEFAULT CODE
function FunctionName () {
    var text = SpreadsheetApp.openByUrl(“URL_OF_FIRST_SPREADSHEET”)
        .getSheetByName(“SheetName1”)
        .getRange(“CellRange1”)
        .getValue()
    SpreadsheetApp.getActiveSpreadsheet()
        .getSheetByName(“SheetName2”)
        .getRange (“CellRange2)
        .setValue(text)
}
MODIFYING THE CODE
First, change the function name in this code: function FunctionName () {
Replace FunctionName with any desired name, and avoid using spaces or special characters. You can use underscores (_) or camel case (e.g., myFunction).
Now, update the code below with your actual spreadsheet details from the First Spreadsheet:
var text = SpreadsheetApp.openByUrl(“URL_OF_FIRST_SPREADSHEET”)
.getSheetByName(“SheetName1”)
.getRange(“CellRange1”)
.getValue()
For the “URL_OF_FIRST_SPREADSHEET”, you must paste the URL of your First Spreadsheet between the quotes.
Similarly, replace “SheetName1” with the actual name of the sheet in your First Spreadsheet, such as "Sheet1". For “CellRange”, enter the actual range reference where your data is located. For example, if your data is in cells A1 to B10, use "A1:B10".
Finally, adjust the code below to place the data in the Second Spreadsheet:
	SpreadsheetApp.getActiveSpreadsheet()
.getSheetByName(“SheetName2”)
.getRange (“CellName2)
.setValue(text)
Make sure that “SheetName2” is replaced with the sheet name in your Second Spreadsheet where data should appear, like "Sheet1". Similarly, replace “CellRange2” with the actual range reference where you want the data to appear. For example, if you want the data to go in cells A2 to B11, use "A2:B11".
EXAMPLE OF THE MODIFIED CODE
Here's how the code looks with actual values:
function myFunction () {

    var text = SpreadsheetApp.openByUrl”https://docs..google.com/spreadsheets/d/1QzDdpdET5vN6v9Li_uJd2dt4H1ouY6heLhRmQX9UvEQE?edit#gid=0”)
        .getSheetByName(“Sheet1”)
        .getRange(“A1:B10”)
        .getValue()

    SpreadsheetApp.getActiveSpreadsheet().getSheetByName(“Sheet1”)
        .getRange (“A2:B11”)
        .setValue(text)
}
RUN THE SCRIPT
Now that you've modified the code, Save the script by pressing Ctrl+S or clicking the save icon, then Run the script by clicking the Run button (triangle icon).
Check if the Data Transferred
After running the script, verify if the data from cell range in the First Spreadsheet appears correctly in the desired cell range of the Second Spreadsheet. If the data is displayed correctly, it indicates that the script is functioning as intended.
Optional: Automate Your Apps Script
Without automation, Apps Script codes must be run manually, requiring you to click the Run button each time you want to update your data. Manually running scripts to transfer data between Google Sheets can be a hassle, especially for those who need to frequently update reports, track changes, or share real-time data across teams. Automating this process saves time and ensures your data is always current without extra effort.
.Here’s how you can update your data automatically:
- Set Up Triggers: In the Apps Script editor, select Triggers from the sidebar.
- Add a Trigger: Click Add Trigger and set it to run your function (e.g., updateCell) at your chosen interval (e.g., daily, hourly).
Encounter errors? Troubleshooting!
If you encounter errors due to an invalid URL, make sure to use the correct spreadsheet URL. The URL should look something like this:
https://docs.google.com/spreadsheets/d/1QzDdpdET5vN6v9Li_uJd2dt4H1ouY6heLhRmQX9UvEQE/edit#gid=0
Alternatively, you can use the spreadsheet ID, which is the part between /d/ and /edit in the URL:
var text = SpreadsheetApp.openById("1QzDdpdET5vN6v9Li_uJd2dt4H1ouY6heLhRmQX9UvEQE")
.getSheetByName("SheetName1")
.getRange("CellName1")
.getValue();
Using the spreadsheet ID can sometimes be more reliable.
Robust and Flexible
In this guide, we've covered how to use Google Apps Script to reference data between Google Spreadsheets. This method is more robust and flexible compared to the IMPORTRANGE function, allowing for automation and customization to meet your specific needs. If you're interested in exploring more advanced features and use cases, I encourage you to check out Better Sheets on YouTube and visit BetterSheets.co for additional resources and tutorials.