
Word Tracker and Progress Tracker in Google Sheets
Ever dreamed of having a personal writing assistant right there in your Google Sheets? Imagine tracking your word count, setting goals, and watching your progress grow – all without leaving your favourite spreadsheet app. Well, your dream is about to come true!
In this post, we're going to show you how to create your very own word counter and goal tracker using Google Sheets. It's super easy to set up, completely customizable, and perfect for keeping you motivated on your writing journey.
Let's dive in and get started!
Why Create a Word Counter in Google Sheets?
Ever felt overwhelmed by the blank page? Or maybe you've set a lofty writing goal and wondered how you'd ever reach it. That's where our trusty word counter comes in!
By tracking your word count, setting goals, and watching your progress grow, you can stay motivated and focused on your writing. Plus, having it all in Google Sheets means it's always at your fingertips and easy to share with others.
Ready to give it a try? We've created a pre-made Google Sheet that you can use as a starting point, or you can follow along step by step. Let's get started!
Step 1: Set Up the Writing Space
First, let's create a cozy little space for your words to grow. This is where you'll pour out your thoughts and watch your word count climb. It's like your personal writing haven.
Here’s how:
- Open a new Google Sheet.
- Create a new tab labeled “Words.” This will be the page where you paste your writing or word counts.
- List your words in a column. For example, column A can contain the body of your writing.
- In each row, add the text or words you’ve written for that session.
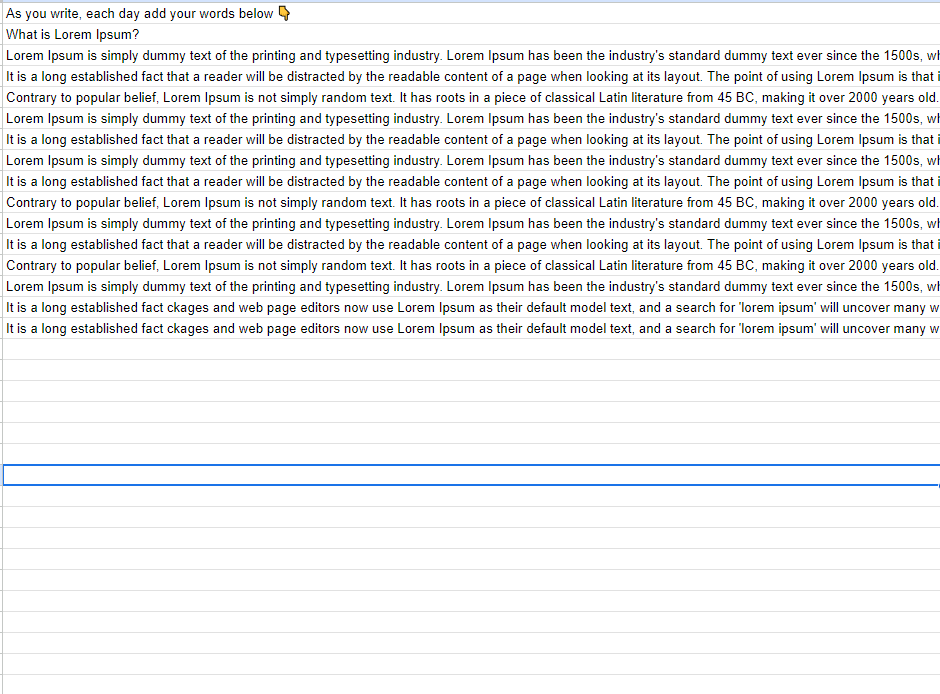
Now that your words are all in one place, we can move on to counting them!
Step 2: Automate the Word Count with Formulas
Now, let's give our words a little count. We'll use Google Sheets' clever tricks to do the heavy lifting, so you don't have to. It's like having a tiny word-counting elf working for you.
1. Create another tab called “Data Crunch.”
2. Use the ARRAYFORMULA function to extract the text from your “Words” sheet. In cell A1 of the "Data Crunch" tab, enter:
=ARRAYFORMULA('Words'!A2:A)

This formula pulls in all the words from your first sheet.
3. Use the SPLIT function to count the words. Create a new column (say, column B), and enter this formula to split words by spaces:
=IF(ISBLANK(A2),,COUNT1(SPLIT(A2,” “,TRUE,TRUE)))

This formula calculates the number of spaces in each row, which essentially gives you the word count.
Step 3: Summarize Your Progress
We've got our words counted, and now it's time to watch them grow! We're going to create a little progress bar that'll show you how far you've come. It's like having a visual cheerleader for your writing journey.
1. Create a new tab called “Summary.”
2. Calculate the total word count by summing up all the values from the “Data Crunch” tab. In the Summary sheet, use this formula:
=SUM('Data Crunch'!B:B)

This will give you a running total of your word count across all writing sessions.
3. Identify the last writing session. To display the word count from your latest session, use this formula:
=INDEX('Data Crunch'!B:B,COUNTA('Data Crunch'!A:A))

This will automatically pull the word count from the most recent entry.
Step 4: Create a Progress Bar with Sparkline
Now comes the fun part! We're going to create a visual that'll show you how far you've come. Imagine watching your progress bar fill up with each word you write. It's like a little reward for your hard work.
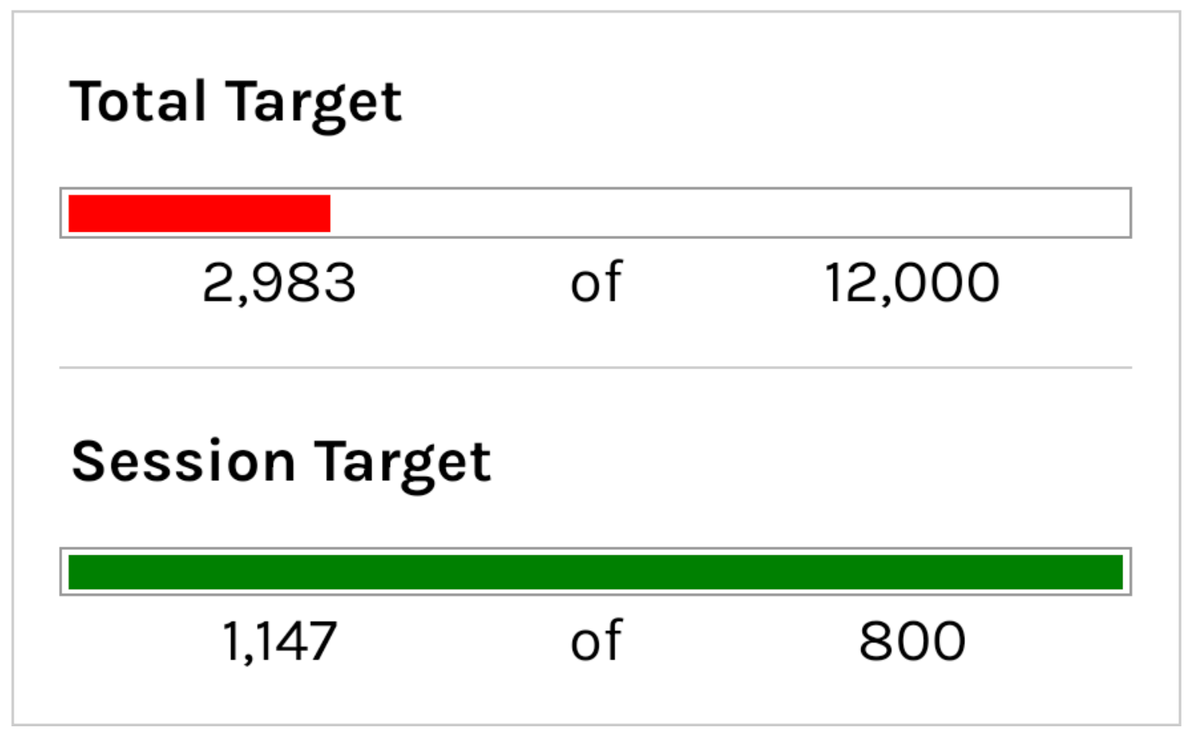
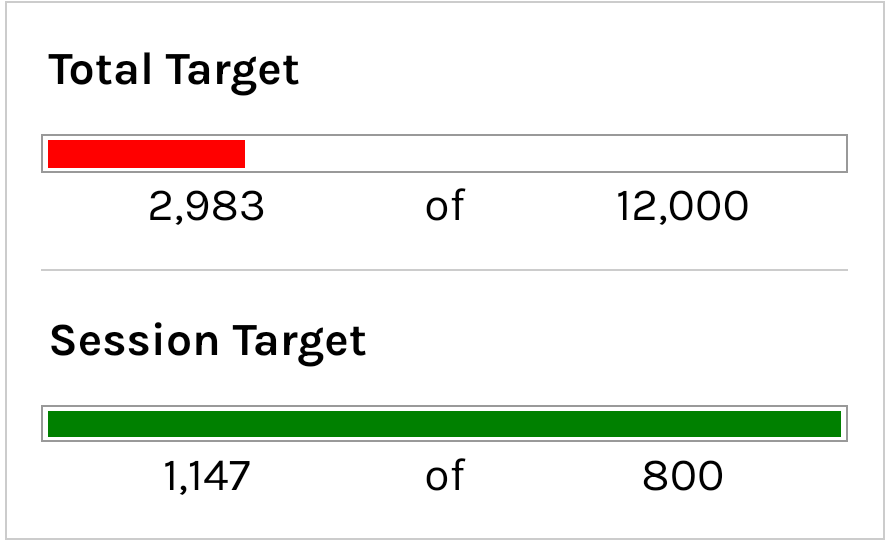
1. Set a target word count—let’s say your goal is 1,000 words for a writing session.
- Create a dynamic progress bar. Use the SPARKLINE function in the Summary sheet. Enter this formula in a cell, and customize the colors to show progress in different ranges, such as red (0-50%), yellow (50-99%), and green (goal achieved). Use this formula:
=if(C8>=E8,sparkline(C8,{"charttype","bar";"max",E8;"color1","green"}),if(C8/E8>0.5,sparkline(C8,{"charttype","bar";"max",E8;"color1","yellow"}),sparkline(C8,{"charttype","bar";"max",E8;"color1","red"})))

This formula creates a simple bar chart showing your progress toward the target. The "max" value represents the goal you set and adjusts the color of the progress bar based on how close you are to reaching your goal.
Step 5: Style Your Tracker for a Clean Look
A polished design makes all the difference! Here are a few tips to give your tracker a clean, professional look:
- Hide gridlines by going to View > Show > Gridlines and unchecking the box.
- Add borders to highlight key sections. Select the cells you want to emphasize, click the borders icon, and choose your preferred style.
- Merge cells where necessary, especially to give your progress bar more space. Just select a few columns and merge them to make the progress bar span across them.
- Add padding around your progress bar by inserting extra columns and rows. Set the row and column width to a consistent size (e.g., 20 pixels) for a balanced look.
Final Touches: Share & Customize
Once everything is set up, you can make the sheet your own. You can tweak the formulas, adjust the design, or change the goals. Google Sheets is highly flexible, and once you’ve got the basics down, the possibilities are endless.
If you’re looking to share the sheet with others, you can easily make a copy and send it their way. Better yet, if you’re a fan of Google Sheets like I am, you can use this template as a starting point and modify it for other projects!
That’s it! You’ve built your own word counter and progress tracker in Google Sheets. It’s a powerful tool to help you stay on track with your writing goals, and you don’t need any expensive software to use it. Feel free to customise it, share it, and improve it as you go.
If you have any questions, feel free to reach out on Twitter or drop a comment below! Happy writing, and keep track of those words!