
How to Use Google Sheets as a Website Database
Did you know you can use Google Apps Script to turn a Google Sheet into a free, auto-syncing database for your website? This guide shows you exactly how to set it up. You’ll prepare your spreadsheet, write a few lines of code and publish your site. Don’t worry if you’re not a developer, we’ll walk you through it.
Why Use Google Sheets as a Database?
For small projects, Google Sheets offers many advantages over traditional databases:
- Free hosting and storage
- Easy to edit data without technical knowledge
- Built-in collaboration tools
- No server maintenance required
This approach might scare some programmers but this works great for event schedules, team rosters, restaurant menus, and any project where non-technical team members need to update the data.
I would not recommend this if you’re trying to build the next Facebook, this will break as soon as you get your first spike in users.
Prepare Your Google Sheet
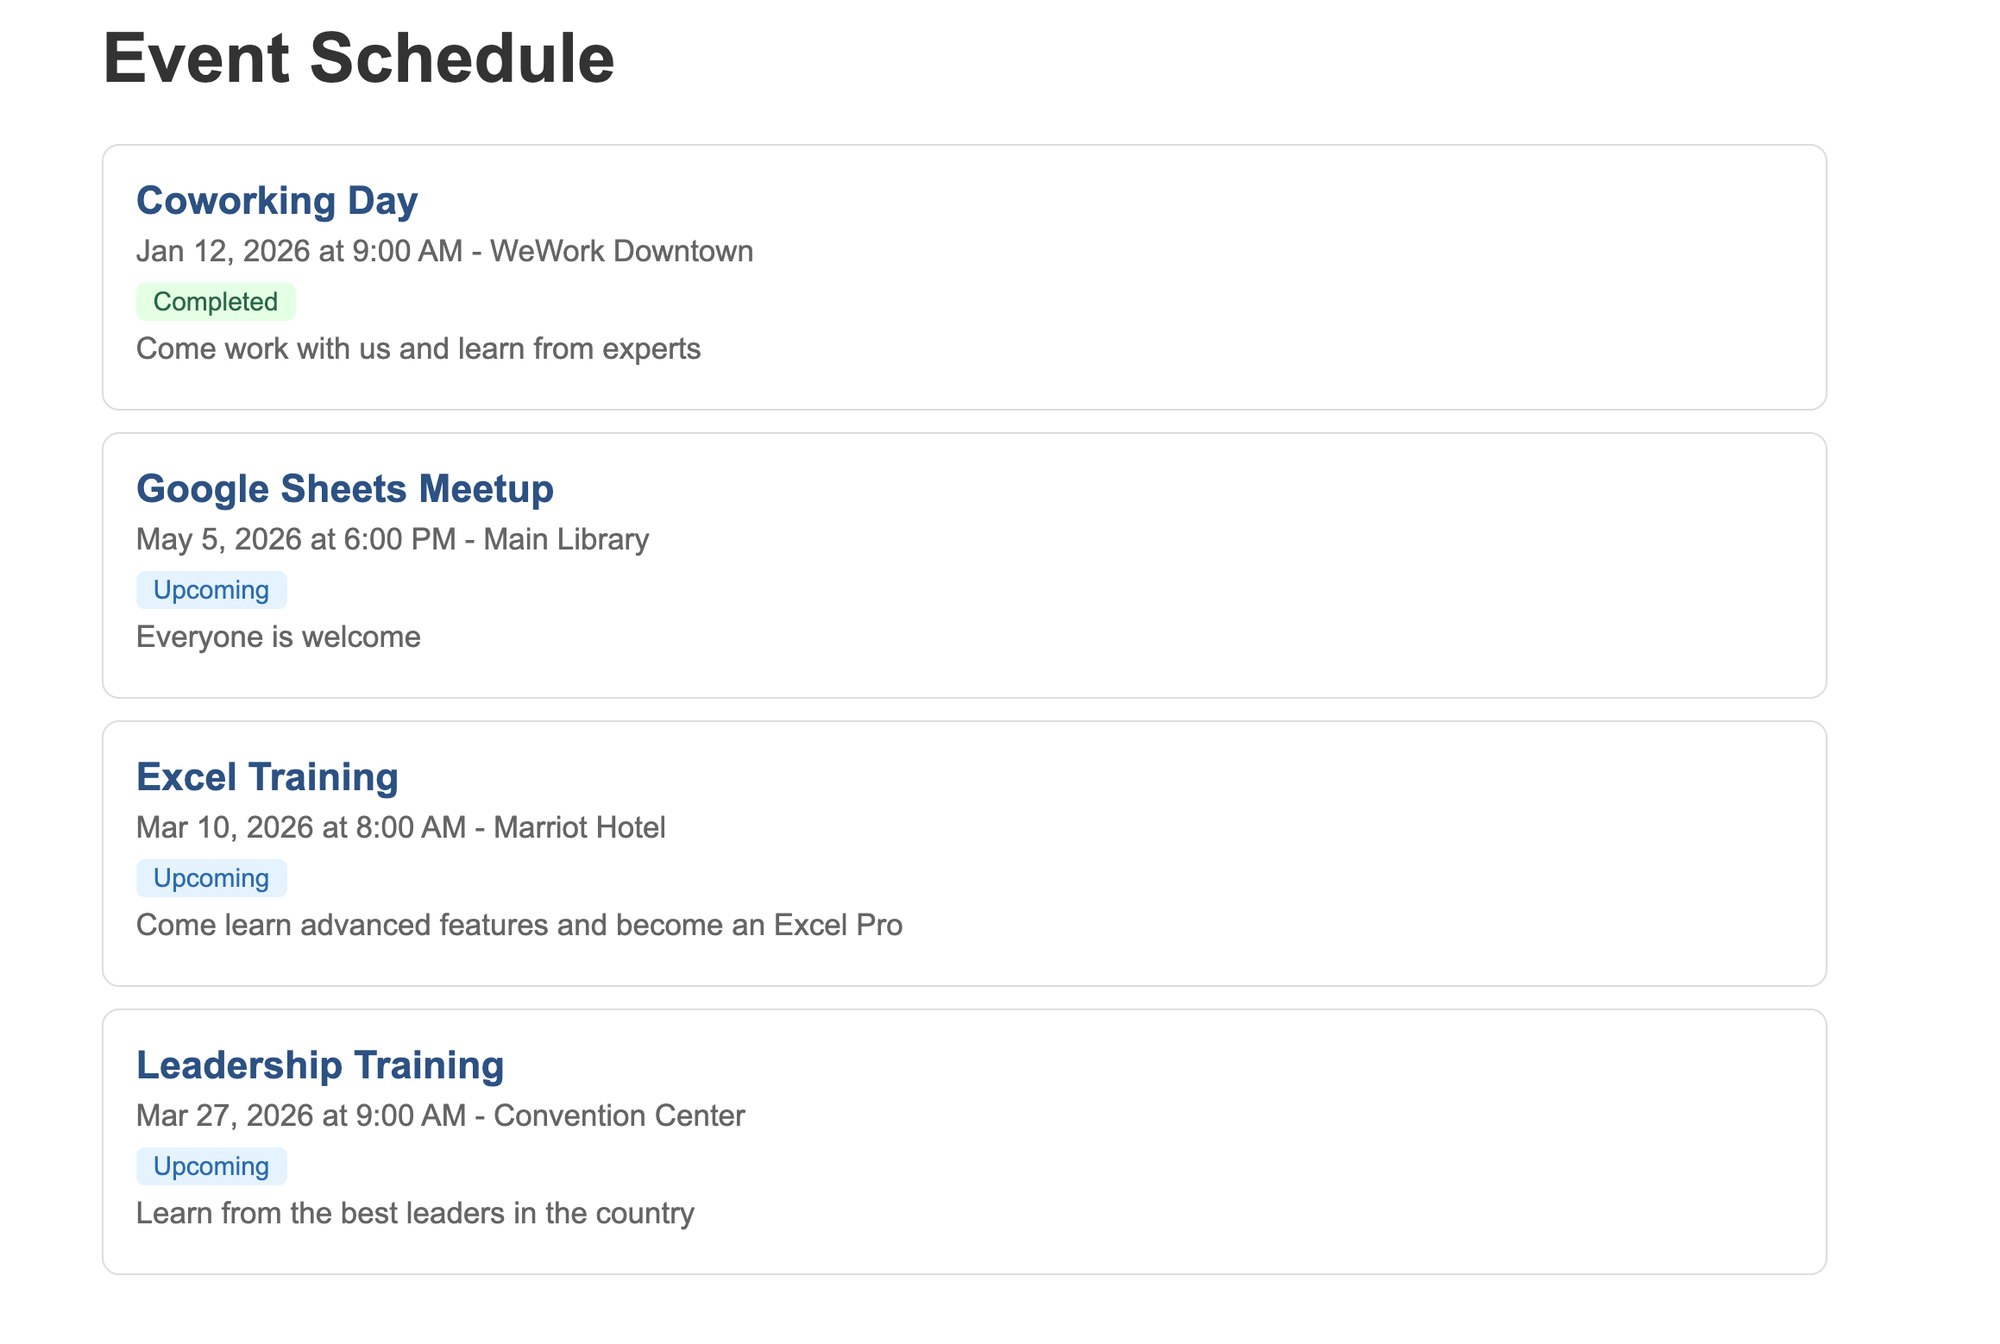
Start with a clean spreadsheet structure. Your first row should include headers and each row after that will include one item.
For this example, we’ll build a simple event schedule. But you can adapt this structure for product listings, restaurant menus, directories, or any data you want to display.
Create a new sheet and add these columns in Row 1:
- Date
- Time
- Location
- Title
- Description
- Status
Add a few rows of sample data and make sure you format the first column as dates so the code can handle them properly.
Use the free template
We've created a ready-to-use template with all columns set up and the script pre-configured. Open our event schedule template (Google Sheets as a Database) to get started quickly.
Connect Your Sheet with Apps Script
Open the Editor
- In your Google Sheet, click Extensions > Apps Script
- Delete any code in the editor
- Paste the code below
Apps Script Code
This script does two main things: it serves your HTML page and fetches data from your spreadsheet.
// serves HTML page
function doGet() {
 return HtmlService.createTemplateFromFile('index')
 .evaluate()
 .setTitle('My Event Schedule')
 .addMetaTag('viewport', 'width=device-width, initial-scale=1');
}
 function getData() {
 // create a reference for your google sheet
 const sheet = SpreadsheetApp.getActiveSpreadsheet().getSheets()[0];
 const data = sheet.getDataRange().getValues();
 // remove headers
 const headers = data.shift();
 // return parsed data
 return data.map(row => ({
   date: formatDate(row[0]),
   time: formatTime(row[1]),
   location: row[2],
   title: row[3],
   description: row[4],
   status: row[5]
 }));
}

function formatDate(value) {
 if (!value) return '';
 const date = new Date(value);
 return date.toLocaleDateString('en-US', {
   month: 'short',
   day: 'numeric',
   year: 'numeric'
 });
}

function formatTime(value) {
 if (!value) return '';
 const date = new Date(value);
 return date.toLocaleTimeString('en-US', {
   hour: 'numeric',
   minute: '2-digit'
 });
}
Customize Your Data
The getData() function maps spreadsheet columns to JavaScript object properties. To adapt this for your project:
- Change the property names (date, time, location, etc.) to match your data
- Update row[0], row[1], etc. to match your column order (0 is column A, 1 is column B)
- Add or remove properties based on how many columns you have
If you're building a product catalog, your getData() function might return properties like name, price, category, and imageUrl instead.
Build Your Website
Now create the HTML file that displays your data. This template pull data from your spreadsheet and renders it on the page.
<!DOCTYPE html>
<html>
  <head>
  </head>
  <body>
   <h1>
     Event Schedule
   </h1>
   <div id="content">
     Loading....
   </div>
   <script>
   // this calls the server-side function in Code.gs
   google.script.run.withSuccessHandler(displayData).getData();
     function displayData(items) {
       const container = document.getElementById('content');

       // Generate HTML for each item and join them into one string
       container.innerHTML = items.map(item => `
         <div class="item">
           <div class="item-title">${item.title}</div>
           <div class="item-meta">${item.date} at ${item.time} - ${item.location}</div>
           <span class="status status-${item.status.toLowerCase()}">${item.status}</span>
           <div class="item-meta">${item.description}</div>
         </div>
       `).join('');
     }
   </script>
 </body>
</html>
Create the HTML file
- In Apps Script, click the + next to Files
- Select HTML
- Name it index (without .html)
- Replace the default content with the code below
Add basic styling
Now you have a basic skeleton displaying your spreadsheet data, let’s take it to the next level by adding some CSS. Paste the following code block inside the head tag:
<style>
     body {
       font-family: Arial, sans-serif;
       max-width: 800px;
       margin: 0 auto;
       padding: 20px;
     }

     h1 {
       color: #333;
     }

     .item {
       border: 1px solid #ddd;
       padding: 15px;
       margin: 10px 0;
       border-radius: 8px;
     }

     .item-title {
       font-size: 18px;
       font-weight: bold;
       color: #2c5282;
     }

     .item-meta {
       color: #666;
       font-size: 14px;
       margin: 5px 0;
     }

     .status {
       display: inline-block;
       padding: 2px 8px;
       border-radius: 4px;
       font-size: 12px;
     }

     .status-upcoming {
       background: #e6f3ff;
       color: #2b6cb0;
     }

     .status-completed {
       background: #e6ffe6;
       color: #276749;
     }
   </style>
Publish Your Website
Deploy your project to get a public URL anyone can visit.
- Click Deploy > New deployment
- Click the gear icon and select Web app
- Add a description (optional)
- Set "Execute as" to your account
- Set "Who has access" to "Anyone"
- Click Deploy
Google provides a URL that looks like: https://script.google.com/macros/s/xxx/exec
Share this link with anyone who needs to see your data. Check out a live example of the event schedule page.
Now you’re ready to share the spreadsheet with coworkers, friends and family. Once new rows get added your web page will update instantly.
Limitations to Keep in Mind
Google Sheets works well for small-scale projects, but has constraints:
- Cell limit: Sheets support up to 10 million cells.
- Speed: Apps Script web apps load slower than dedicated hosting. Expect 1-2 seconds on first load.
- Request limits: Free accounts get 20,000 URL fetches per day.
- No custom domain: Your URL will always be a Google script URL.
- Concurrent users: Heavy traffic can slow things down.
For high-traffic sites or complex applications, consider migrating to a proper database. But for event schedules, directories, simple catalogs, and team dashboards, Sheets handles the job perfectly.
Other Methods: Google Sheets API
For existing websites, the Google Sheets API lets you fetch data directly. You’ll need to set up API credentials in the Google Cloud Console and handle authentication. This works well when you have a separate front end application hosted elsewhere. Check the official Google Sheets API documentation for setup instructions.
Bottom Line
You now have a working website powered by Google Sheets. Here are some ways to expand on it:
- Learn how to Develop The Mindset of an Apps Script Coder
- Use CSS frameworks like Bootstrap or Tailwind for better design
- Implement a search box to find specific items
- Use Apps Script to create an automated form that writes data back to your sheets
The combination of Google Sheets and Apps Script gives you a surprisingly capable platform for simple web applications. Start with the basics, then build from there.
-This has been a Guest Post by Vinny Costa at Paresa